Custom domain for blogger

7:06 AM Add Comment
Wellcome to Blog Guidelines. Hopefully today is better than the day yesterday. On this occasion Blog Guidelines will discuss :custom domain for blogger.

Blogger / blogspot is a service to create a blog for free provided by google. Create a blog in blogger can be done very easily, just a few steps, then you will have a blog. If you already have a blog, then you can write anything, whether it was the result of thought, experience or anything that could benefit others. Bloggers can also be used to capture your photo, and after your photo is posted in the blog, then you very easily to share with your friends. And there are many features provided on bloggers, ranging from facilities to make a post which can be filled with text, images, code and so forth.

As for some of the surplus in the blogger is very simple management, several options are available templates, blogger default template can be customized to your liking, the template can also be replaced with the work itself, could add some widget selection, can also do custom domain of blogspot.com to your own domain.
Well, here I try to take the discussion about how blogger custom domain, or easy it is to change the language blogspot to custom domain, there is also a call to how to change blogspot to the website.

If you hear mention of the domain, then in our minds would be unthinkable: "Should spend money to buy". Because in general, the domain can be had by buying. But, not all domains can be had by buying, and I have found it. Domain whether that can be had for free?
Please follow the discussion below.

Custom blogger to free domain

1. Open the website dot.tk

2. Enter / type the domain name you want. Keep in mind, it is better to specify the domain name in accordance with keywod to be in the viewfinder, for example, your blog about the recipes, the domain name that you choose should have the word cuisine, if your blog is about tutorial blog, then the domain name that you specify must contain word blog for example blogguidelines, or blogtutorial or others
3. Once you enter a domain name, and then you select Use DNS by putting a tick in the circle provided
custom domain for blogger
4. Select "DNS-person" you, and there is written "Use your own DNS Services" column underneath there is a name server that is required.
Well, the name server simply filled in: ghs.google.com
5. Determine domain time you need, select only 12 Month
6. Enter the characters in the column provided
7. Click Sign up
8. You can do signup via facebook account, Googgle Windows Live, Aol, Flickr, myOpenID, or also by entering your email name.
9. Continue to click Next

After successful Signup, continue to verify your account via email you use.

Let's just say the above steps have been completed
1. Do log on account dot.tk
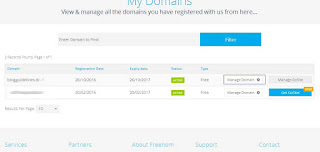
2. Select Service> My Domains> Manage Domains
custom domain for blogger

3. Click "Manage DNS Freenom"
custom domain for blogger customize

4. In the Add Record, fill some of the following code:
Name: Empty
Type: A
TTL: 14440
Target: 216.239.32.21

more Records

Name: www
Type: CNAME
TTL: 14440
Target: ghs.google.com

more Records

Name: code of custom blogger
Type: CNAME
TTL: 14440
Target: the code of the custom blogger
add records for blogger domain custom

Click save change

To get the code of custom blogger can be done by:
1. Login to blogger
2. Basic settings
3. Publishing> Blog Address> Click "+ Setup a 3rd party URL for your blog"
4. On Third party domain settings, enter your domain, continue with SAVE. See pictures setting custom domain for bloggers


custom blogger url domain


5. Take the blogger custom code, then enter the column Manage Your Domain

Similarly, a post on how custom domain for Blogger

add image to header blogger

1:20 PM Add Comment
This time the Blog Guidelines will give you a guide on add_image_to_header_blogger. Blog header is located on the top positions of the blog. But there is also a blog puts the navigationbar above header. Blog header usually contains the blog name, logo and description of the blog. The header of the blog function to display the identity of the blog readers of this article certainly already know what it is the header of the blog, and where the position of the header of the blog. so no need to be explained more.

As we know, the blog header has a function to display the identity of a blog. Then the header nor could we change it by adding pictures that represent the identity of the blog. Images that can be loaded in your own design or could be the result you take pictures with your favorite camera. If you want to add images own design, then you can use one of several software photo editor, or the more popular use is Photoshop and Corel Draw. The image size must be adapted to the blog, to make it look more presentable and pleasant.

As we know, the blog header has a function to display the identity of a blog. Then the header nor could we change it by adding pictures that represent the identity of the blog. Images that can be loaded in your own design or could be the result you take pictures with your favorite camera. If you want to add images own design, then you can use one of several software photo editor, or the more popular use is Photoshop and Corel Draw. The image size must be adapted to the blog, to make it look more presentable and pleasant. And as a suggestion, so that the image size is not too big, because if the image is too large will make loading the blog to be slow. Is not it, when you open a blog belongs to someone else, you do not like it if the blog is slow? Likewise, people who visit the blog we wish that our blog has a high speed. Well, so the image is not too heavy, so make sure the images to be used in order to advance in the compressed.

Let's start looking at the Guide to add images on the header of the blog:
-If you are already logged in to blogger? If not please login
-Open Layout
-On the Page Layout, find the widget headers and click EDIT
-After that, you are confronted with page "Configure_Header"
add image to header blogger

If your picture is on the computer, then select From your computer, and then click BROWSE, find the picture file you will add
If your image is on the website, then select From the web. Paste an image URL below, enter the url of your image in the column below.

You can give options in the Placement
-Next click the SAVE

When you have successfully entered the picture and has yet to get satisfactory results, then you can edit the image back and try the upload again in order to get satisfactory results in.
Keep after the picture in the header of your mounted speed test blog, whether after adding a picture in the header, loading the blog so very slowly or not? If the blog becomes burdened with their image, I suggest to shrink re-size images.
Maybe that's all, the discussion of "add image to header blogger". Hopefully this post helpful, and do not forget to leave a comment.
Sorry, if the words in this post does not fit.

how to change blogger template xml

8:51 AM Add Comment
Wellcome to Blog Guidelines. Hopefully today is better than the day yesterday. On this occasion Blog Guidelines will discuss how to change blogger template XML.
In the past, posting a post that almost the same i.e. how to customize templates, blogger at the post describes how to change blogger template xml.

If we look at some blog famous, among them many are not using the default template. But the blog using templates or design your own results there is also a template that uses the results of other people's designs, be it the template blogger templates blogger premium version or the free version. From which the template can be obtained? To get the templates for blogger please try searching using your favorite search engine with the word "download blogger templates", then you will get a large selection of templates that you can use.
how to change blogger template html

Let's say you've got a template that suits your taste, the blogger templates you have saved on your computer, and now it's time we change the template blogger download results.
- Let's login to blogger
- Open The Template
- Click Backup/Restore
- Please backup your template by clicking Download full template
- If you have your blogger template already in the backup, do upload your blogger template.XML click Browse, locate the file you blogger template.XML that will be uploaded, and then click open
how to change blogger template xml
- If you have found, please proceed by clicking the upload

recent comments widget for blogger with avatar

3:32 PM Add Comment
Wellcome to Blog Guidelines. Hopefully today is better than the day yesterday. On this occasion Blog Guidelines will discuss :recent comments widget for blogger with avatar.

Recent comments widget function to display the visitors on the blog. The advantage of displaying recent comments widget is the owner of the blog without a login can see any new comments there, as well as visitors. and there is the possibility of visitors will prefer to leave a comment after they open one of my articles, because their comments will appear in the widget and with the appearance of their comments on the widget it is possible that other visitors will see seiapa sebanarnya has left a comment, so most likely the visitor will see profile commentator. And in General on their profile there is a link blog or website with hers, so there are likely people who see profile commentator will visit his blog/website.

Well, the blog guidelines will try to give you a brief guide on how to make widgets recent comments with avatars
- Log into your blogger account, open Layout, Add gadgets,
- Click the HTML/JavaScript then Add,
- Enter the following code:
goo.gl/E4ZkPD
replace http://blogguidelines.blogspot.com with the url of your blog, and change Si Udin author by the name of your blog
- Save

how to change your favicon on blogger

2:56 PM Add Comment
Wellcome to Blog Guidelines. Hopefully today is better than the day yesterday. On this occasion Blog Guidelines will discuss : Favicon is short for Favorites icon. Favicon on your blog will be seen when the blog is opened, a small logo-shaped favicon and will look when a blog has been open and his position is under the menubar browser used. By default the blogger has given a favicon that "B" logo with white color and the background color to orange. I think the readers of this article; better understand of what and where the favicon on your blog. So there is no need to discuss it at length.

How to make favicon ::
1. You must have a picture that will be used as a favicon. Images can be made or can also use an image in sedikan by other sites. To obtain the images on other sites, can search through your preferred search engine. When finished, proceed save images with the extension jpg or gif.
2. If faveicon will make your own, then you can use the software Photoshop or other image editor software.
3. After the image has been successfully you have, whether it's the work itself or downloaded from another site, then be prepared to upload pictures.

how to change your favicon on blogger
Now we start to open the guides replace the favicon on blogger. to change the favicon in blogger is very easy:
- Let's signin to blogger
- Open Layout
- Top of page box layout there is a box with a Favicon, writing please click on edit
- Next you find the Configure page Favicon.
- To change the favicon please click on Browse, search and find images that will make your blog favicon and click open
- If you have successfully uploaded, please proceed by clicking SAVE

To see the results of your work please click VIEW BLOG

how to submit blogger sitemap to bing

10:30 AM Add Comment
On a post that had been then Blogger Guidelines have made a blog post about submite to google search engine. It is no less important this time around BLog Guidelines try to do a Bing Search engine blog submite, to later Blog Guidelines can be indexed by the Bing Search engine.

While it may guide submit blog to Bing Webmaster has been widely made by the bloggers who are already proficient, but there is no harm anyway Blog Guidelines make articles about submit blog to Bing Search engine anyway. At least admin Blog Guideline can share experiences, the steps that have been undertaken in doing submit blog to bing search engine.

Let's start the Guide submit blog to bing search engine
1. Open your browser
2. type bing.com
3. Do sign up on bing
4. When you are finished working on signup on bing, don't forget do verify by opening the email used to register
5. Go to Submit your Site to Bing
6. Enter your url in the Type the URL of your homepage
7. Enter the anti spam code

how to submit blogger sitemap to bing

8. Click Submit
9. Click the Greatme. Signup
10. Next you will find a page form that must be filled out
-On the url: it has been filled in automatically
-Add sitemap: enter your blog sitemap

Example: http://blogguidelines.blogspot.com/sitemap.xml

-In the section About me, please fill in with your data
-If you have completed filling out the form on aboutme, continue by clicking SAVE
-You will be taken to a new page, bing webmaster verification page
-Copy the code to your blogger meta tags, to verify your blog. examples of code like this:
< meta name = " msvalidate. 01 " content = " 123456789123456789 "/>
How to add a verification code bing: open blogger html Template-Edit-Add meta code above "head" Save Template
-After you have finished adding the code to your blogger, continue with verifying on bing webmaster by means of click VERIFY on bing webmaster page.

For a while until it here first, hopefully Blog Guideline immediately indexed by Bing Search engines and can also get thousands of visitors especially from the bing search engine.

add background image to blogger template

8:45 AM Add Comment
Add or change a background image from Blogger templates. At this time the post "Blog Guidelines" try to give guide how do I change or add a background on his blog.

Sometimes there are some visitors who prefer a blog that is beautiful, full of colorful, either in writing or background.
To add / change the background on the blog can be done by changing its color using css, but can also be done by adding pictures. And keep in mind back, if you replace the background by adding pictures, promoted by the addition of the image so that blogs are not too overwhelmed (in the sense of loading the blog does not become unwieldy) as if the blog becomes severe, then the blog will be difficult to open by Internet users with access slow.

Here are some tips for selecting images to be used as background blog:
1. The image size does not exceed 500KB, if the image of your choice turns out to exceed the size of 500 kb, then you have to compress the image into maksial 500KB.
2. Large image of at least 1024x768 px
3. If the bmp image format of your choice, please changed to jpg format. because in general the image with bmp format larger than image formats including jpg.
4. To change the format of the image and reduce the image size, image editor software can be used. Eg Photoshop or you can also use the Microsoft Office Picture Manager. All depends on your skills.


If you are using the default template, which is used to add or change the background is very easy.

Here's how to change or add a background on blogger default template:
-Don't forget to login to blogger
-Open The Template
-Click The Customize
-Search and click the Background
-Click the arrow below the image, and select Background images provided by bloggers or can upload images of your property that is on the PC.

If the "Customize" on the template you are using is not working/not able to display the menu background then you could change the background by adding the URL of images that have been uploaded.
The following steps change the blogger template background is:
-Let's just say it's been logged in blogger
-Open the Template > Edit html
-Search and find body {
-Add the code
background-image: url (add image link here)
-Do the preview to see the result, if successful, please click Save

An example of how to replace the background.

Let's just say the image below is a picture which we will use to become a background,

add background image to blogger template


Now we take the image url:
3.bp.blogspot.com/-Hl926UVflww/VrGuzQwSPuI/AAAAAAAAAC0/DkMBNllcQxs/s1600/IMG_4613.JPG

So the way to make the placement of images into the background of the blog is:

body {background-image: url (https://blogger.googleusercontent.com/img/b/R29vZ2xl/AVvXsEgFqQncaEiHJvfhPiJ0w-Thc1ZH3mqkjKFz6zQXuaEYm6xfG4dqlP6d2S4XJDjRu3maebgxKVmW0FEGz4CTsSwgiZFMRat8elMoRXpscCYnPvnSUYy99KQOROxtSHYq62aB4QQfYryX2Fh2/s1600/IMG_4613.JPG)

Please stop here first, hopefully posting on "add a background image to blogger templates" to help, and do not forget to share with your friends.

how to add numbers list for popular post in blogger

5:46 AM Add Comment
Wellcome to Blog Guidelines. Hopefully today is better than the day yesterday. On this occasion Blog Guidelines will discuss :how to add numbers list for popular post in blogger
Suppose now that we have installed the latest post on blogger. There is still a very popular simple. On a popular post that we can display tumbnil and excerpts of posts but currently popular post that you have not had a bullet or a numbers list. Therefore, at this time the post "blogging Guidelines" will try to make a guide to add number list on a popular post.

Oh yes, it's possible there are still some readers of this article who do not know how to add popular post on blogger, so it's good "Blogger Guidelines" repeat again how to add popular post on blogger: Blogger, Open Layout, Add gadgets, Click Popular Posts
Popular Posts and Add, Save. To make it more clear, please look again posting: how_to_make_popular_post_in_blogger
In accordance with the above title are: how to add numbers list for the popular post in blogger, it's high time we discuss it.
(1) after you log in to blogger
(2) search and find the code:
.-posts of popular widgets. ul {
list-style: none;

(3) Replace none with Square or circle or to display the bulleted
(4) Save

simple recent post widget for blogger

3:56 PM Add Comment
Wellcome to Blog Guidelines. Hopefully today is better than the day yesterday. On this occasion Blog Guidelines will discuss : Most blog owners expect that visitors linger are on our blog. When you are finished reading one article we wish they unlock the article more. If our desires come true then at least the visitors that can help reduce the bounce rate of a blog.

This kind of desire can be realized in several ways, including us as owners of the blog attempting to display popular post widget, recent post, related articles, recent post and others. with the editor widget-widget at least the visitors involuntarily can see several titles of posts that appear on the widget-widget.

Well, this time the Blog Guidelines attempt to provide guidelines for making a recent post. Recent post that I give is very simple and light, and also how to make it simple. Let's start how to create simple recent post on blogger:
(1) how are you already logged in? If not, please log in to your blogger account
(2) Layout
(3) Add a Gadget
(4) HTML/JavaScript then Add
(5) Insert the following code
<script>
//<![CDATA[
function showlatestposts(json){document.write('<ul id="recent-posts">');for(var i=0;i<7;i++){var entry=json.feed.entry[i];var posttitle=entry.title.$t;var postsurl;if(i==json.feed.entry.length)break;for(var k=0;k<entry.link.length;k++){if(entry.link[k].rel=='alternate'){postsurl=entry.link[k].href;break;}}
document.write('<li class="recent-posts">');document.write('<a href="'+ postsurl+'" target ="_top" title="'+ posttitle+'">'+ posttitle+'</a>');document.write('</li>');}
document.write('</ul>');};
document.write("<scr" + "ipt type="text/javascript" src="/feeds/posts/default?orderby=published&amp;alt=json-in-script&amp;callback=showlatestposts"></scr" + "ipt>");
//]]>
</script>

(6) save, and see the results

add popular posts css for blogger

2:45 PM Add Comment
add popular posts css for blogger. Basically bloggers have provided a popular post widget. It's just that when we make a new blog, the popular post widget does not appear by itself. On the article past "Blog Guidelines" have been discussing how to add popular post on blogger, please see the article titled "how to make popular post in blogger". In the post "Blog Guidelines" has explained the steps add popular post on blogger in detail.

When we see a popular post resulting from the Guide "how to make popular post in blogger" is still very simple. However, from a popular post that has existed and we can change it without deleting or editing on a popular post that already exists, but it is enough to add some css code on his blog.

add popular posts css for blogger

Well, the css to add popular post for bloggers can be done through the guides below:
(1) Let's login to blogger
(2) open a template
(3) to Customize
(4) the Advance
(5) Add css
(6) add the following css code in the column Add_custom_CSS

goo.gl/MdlhjL

(7) Apply to blog

It is one of the joys for me if you leave a comment on this post.

how to change language in blogger dashboard

11:20 AM 1 Comment
how to change language in blogger dashboard. Basically the language used when we sign up for blogger is the language of the country where we make a blog, when we create blogs in America then the language used in the blog is in English, when we are in the country of Malaysia then the language used in the blog automatically use the Malay language. The language used in the blog we can see on the Navigation Menu and dashboard.

When we want to create a blog with one language, think of the English language then it is befitting a navigation menu on your blog using the English language. This is because in order to make the language and the language of the blog article merges using the same language. It seems like it would look funny if a blog use English but the navigation using other languages. Using one language in the blog (articles and navigation) that visitors do not feel difficulty when visitors open the blog.
The conclusions of the article above, it would be nice if the language of the blog and the article made using one language, it is useful to facilitate visitors to the blog.

How to change the language on the dashboard of the blog?
How to change the language on the dashboard of the blog can be done through the steps:
(1) Let's login to blogger account
(2) Open Settings
(3) Language and formatting
(4) On the top of the Language and Subtitles. under Language, continue by clicking on the arrow pointing down, and then select the language you will use.
(5) If you want to enable transliteration, please select Enable, and select Disable to disable
Change the language in a manner above only changes normally occur on the dashboard page only, but on the navigation of the blog has not been updated.

Well, to change the language in the blog navigation can proceed by way of:
(1) go to: blogger.com/language.g
(2) Next page will perform Language Selection
(3) Please change the language you want
(4) Don’t forget to click Save Settings
My hope, hopefully the article how to change language in the blogger dashboard can help you, and my happiness is if you leave a comment.

how to customize blogger templates

5:31 AM Add Comment
Wellcome to Blog Guidelines. Hopefully today is better than the day yesterday. On this occasion Blog Guidelines will discuss :how to customize blogger templates. Do current blogger template design is one of a very easy job. Because the bloggers themselves have provided some templates provider options you can use for free, and in the template we are given the freedom to do customization starting from images that can be used for the background, colors and column layout in accordance with your wishes and tastes. That is each time more fun has made changes to the template then we can look at it first before saving it via the menu preview, so by having the preview menu can at least reduce the error rate in doing customization on the template blogger. After we looked through the menu and preview the results turned out to be suitable as what to expect so we can save the job bit by bit.
Blogger template design to do/do customization on a blogger template, then we can do it through:
(1) as usual, we'll have to login to your blogger
(2) select a Template
(3) click on customize
(4) after that we will be taken to Blogger Template Designer page
On that page you can do a design:
Template:
To select multiple templates that has been provided by blogger
Background:
Change the background image with the blog that has been provided by the blogger or you can replace the background with your own images through the image upload options menu
Adjust widths:
On the Adjust widths, you can set the size of the width of the blog will be magnified or minimized.

Layout
On the layout, you can select several options provided by blogger. Currently this article is made, blogger provides as many as 8 options Layout templates.

Advanced
On the advanced options, you can change that very much:
Page Text, Backgrounds, Links, Blog Title, Blog Description, Tabs Text, Tabs Background, Post Title, Date Header, Post Footer, Gadgets, Images, Accents, Mobile Button Color, Add CSS

A little explanation on the advanced blogger template
-Page text: on the page text, you can adjust the text size, color, bold and italics are used on blog page
-Background: at part setting, you can set the background color outside of the Main Background of the blog, blog, blog Header Background
Links: in this section you can set the link color, visited link color blog,
- Blog Title: on the blog title, you can adjust the font size, font color, and bold and italic.
- Blog Description; in the description of the Blog you can set the color of the Blog Description
- Tabs Text: on the Text Tab you can change the font size, color, and font type
Tabs Background: background section Tab on the Tab you can replace/change the background color of a tab on the blog.
- Post Title, you can change the size and type of font on the title of the blog post
-Date Header,
- Post Footer,
- Gadgets,
- Images,
- Accents, Mobile Button Color, Add CSS

blog guidelines hide navigation bar blogger

7:20 PM Add Comment
hide navigation bar blogger. We have shared that blogger is one of the platforms to make a very popular blog, blogger has given us the freedom to share Science and pengetuan for the seekers of information. The way of making any blog is very easy, just a few minutes we were able to have a blog, to do the edit display also is easy, with just a single page of html code we can do the work to change the view, change the color and more. That's simply we have a blog on blogger.
While we have recently made a new blogger, and when you see the look of the blog, usually at the top of the blog there is a navigation or often called navbar. Navbar is located above the header of blogs or blog title.
Anything that ditampilakan on the Navbar?
Navbar features several menus which are: (1) blogger (2) Logo search box (3) Google + Button (4) (5) (6) the next Blog create a blog (7) log in/Log off


What are the benefits of a navbar/navigation bar before login to blogger:

-Logo B
To direct to blogger.com

-Search Box
To search the contents of the blog.

Menu-share: share articles to Google +, email, twitter, facebook.

-Report: hacking to report abuse blog content seen.

Next blog: to see the blog that smell only in the update or new blog.

Create a blog: to create a new blog.

Enter: to log into blogger.

What are the benefits of Navbar after you login:

When we have a login, then we will see the display of the navbar with a different menu when not logged in.
-For B Logo, search box, a menu of share, and report a hacking still remains the same, the only difference there is: (1) the existence of an additional display of the email that you used to login, there are 2 menu (new entries to make it easier for us to make a new post, and (3) design to make it easy we headed over to the Dashboard page

When we hide the navbar, it's against the TOS of the blogger and do our blog will be deleted by blogger?
Answer: it seems there is no problem, as many once we see the famous blog has even been using the domain TLD that is no longer using Nabar, even party blogger currently has also provided the option of choice to hide or show the navbar itself.

How do I hide navbar in blogger/how to display the navbar?
To hide Navbar in blogger there are several stages that must be carried out:
(1) surely we should first login to blogger
(2) search and find Layout
(3) Continue to find the Navbar, navbar at the bottom right corner there is the Edit menu, and click Edit
PICTURES
(4) after you click Edit, and then will perform a configuration page Navbar, on the position of the bottom Navbar page there is select Off, please tick TICK for hide the navbar, and tick tick on blue, Tan, black, silver, Transparent, Transparent Dark Light to display the navbar.
(5) Save
(6) see the result.
That's the way hide the navbar by using the options provided by blogger.

How to hide navbar using the other options?
To hide and show navbar automatically (when the cursor is placed in the area of the navbar, then the navbar will reappear, and if removed then the navbar will be lost) is by way of doing edit html in your template.
(1) Let's say you have logged in to blogger
(2) add the following css code:
#navbar-iframe {} opacity: 0.0; Filter: Alpha (opacity = 0);}
#navbar-{iframe: hover}
opacity: 1.0; Filter: Alpha (opacity = 100, FinishedOpacity = 100);}

3) does the navbar can be hidden in pemanent? Answer: Yes, can permanently hide navbar
How to hide the navbar permanently could do with adding css: koe
#navbar-iframe {display: none! important; height: 0; visibility: hidden;}

There is another question, how do I remove the navbar?
If we want to remove the navbar widget, the steps that must be performed are:
(1) in the circumstances of your blogger account login
(2) a Template, edit html
(3) this code:
b:section class = ' < navbar
Up to:
</b:section>
PICTURES
(4) Save template


add blogger featured post widget with thumbnails

1:10 PM Add Comment
Add blogger featured post widget with thumbnails. Featured Post widget is a widget blogger who currently is a latest widget. Fuuture post function to display the options most favored posts deemed to be known by visitors.
In the future post provided by blogge this, we can also do konfiguran to display snippets of articles and image thumbnails as well. To install the widget future of this post, we do not need to edit htm / without edit html, enough to just do a few clicks future has been able ditampilan post on your blog.
Here's how to add blogger featured post widget with thumbnails
(1) Login to your account blogger
(2) Layout, and click Add Gadgets
(3) Click the Add Entry underdog
(4) Configure the Configure page Posts underdog
On the Configure page Posts underdog, you can choose what will be displayed:
- Show the title entry
- Show snippets of text
- View image
(5) Preview, to ensure your view will show on the widgets futures post
(6) Save, and see the results

guidelines hide and show the comment box on blogger

2:43 AM Add Comment
Welcome to Blog Guidelines. Hopefully today is better than the day yesterday. On this occasion Blog Guidelines will discuss : guidelines hide and show the comment box on blogger. Blog comment box serves to facilitate visitors or blog readers to comment upon articles that she has. Maybe it was the form of criticism, suggestions, or could be just a thank you over the articles that have been presented.
By default the comment box has been provided by blogger, so each blog platform with bloggers already has facilities the comment box. It's just that sometimes the owners of blogs with deliberately hid some reason or display it so that visitors are easier to comment.
The following article is pointers to hide or display columns commenting on blogger:
1. Please login to blogger
2. Search and find basic settings,
3. In the settings section, click post and comment
4. Then there is some parts please find below comments and there is a Site comment?
-To hide a comment, please select the Hide
-To display the comment box, please select the Embedded, full pages, pop-up Windows
5. If we choose show comments, you can configure who can comment. In this configuration you can select:
-Everyone-including Users without a name
-Registered users-including OpenID
-Users with Google accounts
-Only members of this blog
(1) and on the comment moderation you can also do the configuration
-Always moderated
-Sometimes, and
-Never
(2) Show word verification, you can also select Yes or no
If Yes, it means that every possible comment, then they must verify by entering verification codes
(3) on the reverse link, you can also choose:
-Hide
-Show
(4) next, you can also add a message on the comment form, namely in the "comment form Message"
Here you can give the message to the reader, for example: thank you for your visit, please feel free to provide feedback on the posts you have read.
It's just a discussion about "" may help, please leave a comment to add to the spirit of the course in building this blog

how to make popular post in blogger

1:56 PM Add Comment
how to make popular post in blogger or it could be How to add popular post in blogger
Popular post on blogger is a widget that displays the most popular posts for the post, the most widely viewed, the most read post by visitors.

Many ways and styles that are used by the blog owner in showing popular post, start simple, animation, there is also a display only post titles only, featuring a post along with a snippet of the content of the post, there is also featuring the title of the post along with a snippet of the content of posts and pictures.

To change the appearance of a popular post simply by adding the css on the template of the blog.
Popular post widget proper has been provided on blogger, with a standard view. However, although still a standard we can also do custom on a popular post by choosing what we want to show latest post.

Well, to shorten the story, it's good we have discussed how to add popular post on blogger.
(1) If you are already logged in to blogger? If not please login
(2) open the layout-Add a gadget
(3) search and find Popular Entries and add
(4) A Popular Entry Configure page appears after you add and please do configuration Entries.
-On the section title usually has written Popular Posts
-Most visited section, you can choose one; At any time, last 30 days, or the last 7 days
-on the Show; The titles of the entries cannot be customized, image and thumbnail excerpts you can specify whether you want to show or not.
-In the section Show up to, you can choose how much you would be showing pupolar post. On the option Show up to, the maximum that could be shown only 10 entries
(5) click Save
(6) Please see the result

Now you have finished creating the Popular Entries, and certainly there's blog has been featured on a popular post widget. However? easy isn't it. Hopefully the post how to make popular post in blogger can benefit exists, and since you have opened this page, so I beg very to be left a comment. Thanks

how to make responsive blogger template

10:17 AM Add Comment
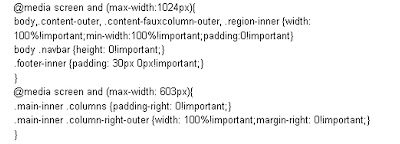
How to make responsive blogger template, simple responsive blogger template guidelines or customize blogger mobile template. Currently I have has a blog with a blog name guidelines, and currently I am using the default template blogger at desaign by Josh Peterson, he gave the name of this template is a Blogger Template Style.
When I open the blog "blog guidelines" through the provider, this blog featured mobile device adjust the size that I use with different views when we open it up through the desktop computer. It's just that there are widgets on a blog does not appear when opened using mobile media.
At this time the post I will try to make my experience of wdiget appears when we open in mobile, or often called as responsive.

What is template responsive?
Responsive template is one way that is used to create design templates blog/website to be able to adjust itself on a device used by the visitor, whether orientation or size. When visitors use your desktop computer with the width then the blog/website will perform width anyway, if the blog/website is opened via a smartphone then it looks will automatically adjust the size got smaller smartphone, and usually if the blog is opened using a smartphone then the look of the blog will be different with the look of the desktop.

To know the appearance of responsive on Smartphones we can easily look at it with a smartphone or other mobile device. The easiest way is to shrink the size of the browser used.
Template responsive tend to go in on a mobile device
By default the template actually on blogger had already prepared a mobile version, it's just a mobile version that is available by default on blogger not displaying the widget, it is actually making the blog when accessed via the device of the car became lighter, only widgets that we make in the blog are not shown on the mobile version of the default template blogger.

Well, from the description at length above, let's try making our blog template be responsive and can print widget on your blog.
how to make responsive blogger template

To make the template blogger be responsive is as follows:
1. Open the bloggers and login with your account
2. Locate the template > Edit html
3. Search and find code
how to make responsive blogger template_1
4. Replace with code:
how to make responsive blogger template_2
5. Find again the code

how to make responsive blogger template_3


6. Add the code above

how to make responsive blogger template_4

7. There is still one more, find this code:

how to make responsive blogger template_5

8. Replace with code:

how to make responsive blogger template_6

9. Save template

Refer all complete code here : goo.gl/hvLuMN


how to display the mobile version of this template?

The mobile version of the template to display/show template edit results that have responsive we're working on are:
-You are still in the position log on blogger
-Select a template
-Once you are on the page of blogger-template, you'll see the look of your template.
-To display the template in blogger responsive edits you, please click on the Rounded serrated Marks under Mobile
how to display the mobile version of this template
-Then the menu appears Choose mobile templates
-Select: Yes. Show template mobile on mobile devices.
-SAVE
See the look of your blog via mobile device, so your blog's template looks responsive customize your device screen sizes.

Pretty in here a discussion of: How to make Responsive Blogger Template. Hopefully it can help, and don't forget to leave a comment

how to install google analytics on blogger

9:36 AM Add Comment
how to install google analytics on blogger. In a previous post we have discussed about blog submission guidelines to google. Let's just say we have finished working on it, now is the time we worked on the "google analytics submit". The benefits and functionality of google analytic is to know in detail, from blog visitors amount per day, per week and per month in detail.

Well, without discussing at length about what is Google Analystic let's try learn how to submit a blog to google analystic:
(1) go to Google Analytics
(2) Did you Sign in with the email of your blog
(3) select Google Analytics
(4) click the Admin
(5) create a new account
(6) on the page Administration › Account, please select a Web site
(7) Please fill in the form under the setting up your account

-Name: enter your name
-The name of the Web site: fill with your blog's url, e.g. http://blogguidelines.blogspot.com
-Category: Please select in accordance with the contents of your blog
-Please select the appropriate time zone and your country
(8) continue with click get ID tracking
(9) next you give an affidavit from Google and if you agree please click I agree
(10) then you will be taken to the next page, and congratulations you've got code Google Analystic
(11) Please Copy the code, specifically for Tracking ID code UA-123456-7 please copy and put it in Blogger > Settings › Other, search "Web property ID Analytics", there is a column of the place melatakkan code Google analystic
(12) specific to the script code. Please copy, then place on the Template > Edit html, right above the code (/head)

For a while until it here first, if you have any questions please send us via the comment box. Thank you
Greetings "blog guidelines"

blog submission guidelines to google

10:33 AM Add Comment
Welcome to Blog Guidelines. Hopefully today is better than the day yesterday. On this occasion Blog Guidelines will discuss :blog submission guidelines to google. Once we have a blog surely we wanted to let our blog is visited by many people, with a growing number of visits against the blog certainly is getting many of the benefits we can give to other people. In addition, if our blog is a blog monotize, then many more income we can. What if we make lousy besusah wrote on his blog but none who read it. Therefore, in order for our blog can be found on a search engine's search results then we need to do to submit blog to search engines.
At this time, the blog posting guidelines try to discuss how to submit the blog to the search engine google.

To perform a submit blog to search engines google is:
(1) type in the Add url on your browser
(2) Find the Google Search Console, and then click Open
(3) do the login, if you have not logged in.
(4) after the login, you will find a page Search Console
(5) On the Search page, find the Console Add a property and then click
(6) if it is in a click Then a menu appears Enter the URL, please enter the url of your blog. For example http://blogguidelines.blogspot.com
(7) continue, click continue
(8) then do verify verify code by copying it and put it to your blog.
Here's how:
-Click on your blog's url, and then click manage property owner
-click Verify using a different method.
-Select HTML tags
-Copy the code
< meta name = "google-site-verification" content = "abcdefghijklmnopqrstuvwaxyz"/>
-Go to blogger > Template > Edit html
-Enter the code above </head>
-Save the template
-Search again to Console, and then click verify
By doing the above way, then your blog in several moments to be found by search engines
Good luck, and Godspeed
There is one special message for you which opens this page. Make sure you leave a comment before you leave this page. Thank you for your visit

Blogging guidelines for beginners

10:01 AM 2 Comments
Blogging guidelines for beginners. This is a first post blog "blog guidelines" at blogguidelines.blogspot.com , this post is deliberately titled "blogging guidelines for beginners". Tells the story of whether the first article on Blogging guidelines for beginners this? Let's look.
The desire to create blog censorship as well. Today deliberately took myself to try to make a blog, and a platform that I use is a blogger.
Upon the success of creating this blog, I'd like to share about how to travel in the making of this blog.
how to create blog guidelines
To create a blog, it is necessary to first have an email. If not, please create an email; email first. Here's how I use to make an email in gmail
1. I open the Google Chrome browser, and then type in gmail.com

2. after the login page comes up, then I click Create an account
3. After appearing the page to Create your Google Account, I proceed by filling out the form provided, and Nextstep to finish until eventually a new email I open
4. Currently I have had an email in gmail

Once you have an email in gmail, I tried to continue with the create a blog on blogger by:
1. click on the google applications that are in the right top corner, click Select, and click again
More from Google. And finally appeared a page google applications like the image below:

Blogging guidelines for beginners
2. click continue with Bloggers
3. You are given a choice of whether to use Google's blogger or profile +, I currently select Google +
3. Next you will get a greeting "Welcome to Blogger"
4. click Continue again to BLogger
5. click New Blog
6. write the title of the blog (for blog title I wrote "blog guidelines") and the blog url (the url for the blog I created "blogguidelines", so for the full url http://blogguidelines.blogspot.com)
7. I choose the template that will be used
8. Click create blog
9. And finally this blog has been completed
Thank you for taking the time to read the article "blogging guidelines for beginners" on the blog "blog guidelines" hopefully this article can be useful.

After you have completed the above steps, now you have a blog, and I congratulate.
Now is the time you fill a blog with interesting articles written in the posting. If you still find it difficult to make a post of your writing, let us continue to read: blog guidelines writing blog

blog guidelines writing blog and blog publishing guidelines. In a few minutes, I eventually had to have a blog that I name "blog guidelines". This blog is still very simple, due to the current conditions of the blog is still new, and while writing this post, it blog "blog" new guidelines have one post, that of a post entitled "Blogging guidelines for beginners". Osting that I made based on experience in the making of this blog.
blog guidelines writing blog
Post this time, I want to share my experiences back about blog-guidelines-writing-blog. So if you follow this course 2 posts: Blogging guidelines for beginners and blog guidelines writing blog, then your blog can give benefits to others. Why do I say so? Because (1) you have to have a blog that can be opened by all people around the world (2) your Blog has a post contains can be read by people all over the world. If you can only do the job on the first post only, and does not do the job on the second post then it means your blog contains no articles. So in conclusion, we have a blog should have the contents of the post. Well, if you feel difficulty in making a post, please follow the "guidelines for writing blog blog"
1. Think of your blog position if not already logged in, please login
2. Click Open a new entry
3. in the column Entry please write the title of the post, for example Blog Guidelines Writing Blog
4. In the column's width, please write the content of the post
5. If the title and content of posts has been completed, continue with click Publish
6. Please see the result
How? It's hard or easy? Of course the answer is, to make a post on a blog is very easy.
If you have opened this page, please leave a comment